When it comes to packaging design and printing, you have two main options: raster and vector images. Choosing the right format can make all the difference in the quality and professionalism of your final product. Understanding the differences between the two is key to ensuring that your packaging looks great and prints flawlessly.
Raster and vector images have different roles to play in the packaging world. Raster images are ideal for capturing the details of photographs, while vector images are great for logos and text because they are sharp and scalable. By choosing the right format, you can be sure that your branding will look crisp and clear, colors will be vibrant and true, and your final product will match your creative vision—no matter the size or complexity of your packaging.
By understanding the ins and outs of raster and vector images, you’ll be better equipped to navigate the design and printing process, avoid common mistakes, and produce consistently high-quality packaging every time.

Key Terms to Understand
Before we dive into the world of raster and vector images, it’s important to understand a few key terms. These concepts are important to understanding how digital images work and how they impact the quality of your printed packaging.
Pixel
A pixel, the smallest unit of a digital image, is often referred to as a “picture element.” These tiny squares of color are combined to form an image on a display or in a digital file. The more pixels that make up an image, the higher the resolution and the more detail in the image. However, when you zoom in on a raster image, you can see the individual pixels. If the image isn’t high resolution, the pixels can detract from the overall image quality.
Bitmap
A bitmap is a type of digital image that is made up of a grid of pixels. Each pixel in the bitmap has a specific color, and all of the pixels together create the complete image. Bitmaps are often used to describe raster graphics and are well-suited for creating detailed and complex images, like photographs. However, because bitmaps are based on a fixed number of pixels, they don’t scale well and can lose quality when they are resized.
DPI (Dots Per Inch)
DPI, or dots per inch, is a measure of the resolution of an image when it is printed. The higher the DPI, the sharper and more detailed the printed image will be. For packaging and other high-quality prints, we recommend a minimum resolution of 300 DPI. If your image is below this threshold, it may appear blurry or pixelated, especially if it is resized or scaled.
With these key terms under your belt, you’ll be well-equipped to understand the differences between raster and vector images, as well as their uses in packaging design and printing.

What is Raster?
Definition of Raster Images
Raster art or images, also known as bitmap images, are made up of a grid of tiny pixels (short for picture elements). Each pixel has a specific color, and all of the pixels together make up the entire image. The resolution and detail of the image depend on the number of pixels in the grid.
Characteristics of Raster Images
- Fixed Resolution: Raster images are resolution-dependent, meaning their quality is based on the number of pixels. When they are scaled beyond their original size, they can become pixelated or blurry.
- Detailed Color Gradients: Raster graphics are well-suited for capturing subtle color transitions and detailed textures. They are often used to create complex and realistic images.
- File Size: High-resolution raster files can be quite large because they contain a lot of pixel data.

Common Uses of Raster Images in Packaging
Raster images are best used for photographic elements or detailed images where color gradation and detail are important. They are often used in packaging for:
- Product photography
- Detailed artwork and imagery
- Background textures or gradients

Common Raster File Formats
- .tiff (Tagged Image File Format): A high-quality format often used in professional printing.
- .psd (Adobe Photoshop Document): An editable format used in Adobe Photoshop.
- .jpg (Joint Photographic Experts Group): A widely used format for compressing images into smaller file sizes.
- .png (Portable Network Graphic): Supports transparency and is often used for web use or overlay designs.
- .gif (Graphics Interchange Format): Often used for simple animations or low-resolution web graphics.
- .bmp (Bitmap Image File): An uncompressed format that preserves image quality but can result in large file sizes.
Advantages of Raster Images in Packaging Design
- Highly detailed and realistic visuals.
- Perfect for complex color gradations and photographic elements.
- Compatible with a multitude of design and editing tools, including Adobe Photoshop.
Limitations of Raster Images in Packaging Design
- Cannot be resized without compromising quality, resulting in pixelation when enlarged.
- High-resolution images can result in substantial file sizes, which can complicate storage and sharing.
- Less adaptable for designs that require frequent resizing or modifications.
Answering FAQs
Is a JPEG a raster or vector file?
A JPEG is a raster file. Comprised of pixels, it is commonly used for photographs and web images. JPEG files are great for compressing image sizes but are not ideal for designs that need to be resized or edited without losing quality.
Is a PNG a vector file?
No, a PNG is not a vector file. PNGs are raster files that are resolution-dependent. They are often used for images that require transparency or high-quality web visuals, but like other raster formats, they lose quality when scaled up.
In summary, raster images are a great choice for high-detail visuals in packaging, but they must be used carefully to meet the resolution requirements for printing. When scalability and flexibility are important, vector graphics may be a better choice.
What is Vector?
Definition of Vector Images
Vector images are digital graphics created using mathematical paths or equations. These paths define shapes, lines, and curves that make up an image. Unlike raster images, which are composed of pixels, vector graphics are resolution-independent, meaning they can be resized to any dimension without losing clarity or quality.
Characteristics of Vector Images
- Scalability: Vector images can be resized infinitely, whether enlarged for a billboard or reduced for a business card, without compromising their quality.
- Clean and Precise: Vectors are ideal for sharp, clean designs such as text, logos, and icons.
- File Efficiency: Vector files are often smaller in size compared to high-resolution raster images, as they store mathematical formulas rather than pixel data.

Common Uses of Vector Images in Packaging
Vector images are perfect for design elements that require sharp edges and precise scaling. These include:
- Logos and brand marks
- Icons and symbols
- Text elements
- Geometric patterns and shapes
- Custom dielines for packaging templates
Common Vector File Formats
- .ai (Adobe Illustrator Document): A proprietary file format used by Adobe Illustrator for creating and editing vector images.
- .eps (Encapsulated PostScript): A standard format that can be used across different vector programs.
- .svg (Scalable Vector Graphic): A widely-used web-friendly format that retains scalability.
- .pdf (Portable Document Format): When saved from vector programs, PDFs can retain vector properties and are often used for print-ready files.
Advantages of Vector Images in Packaging Design
- Infinite Scalability: Perfect for designs that need to be resized for different packaging sizes.
- Editable and Reusable: Easy to modify elements like colors, shapes, and text without degrading quality.
- Smaller File Size: Efficient for storing and sharing compared to high-resolution raster files.
Limitations of Vector Images in Packaging Design
- Limited realism: Vector graphics are not well-suited for detailed or photographic elements.
- Specialized software: Requires programs like Adobe Illustrator or CorelDRAW to create and edit.
- Conversion needed: Often requires conversion to raster formats for certain applications or effects.
Answering FAQs
Why do vector graphics not lose their quality?
Vector graphics do not lose quality because they are built using mathematical equations rather than pixels. This means the image is recalculated and redrawn at any size, maintaining its sharpness and clarity regardless of how much it is scaled up or down. Unlike raster images, which are limited by pixel count, vector paths can adapt to any resolution.
Vector images are essential for packaging designs that demand precision, scalability, and adaptability, making them the preferred choice for logos, text, and geometric patterns. Combined with raster images for detailed visuals, they offer a comprehensive design solution for high-quality packaging.
What is the difference between raster and vector images?
When it comes to packaging design, it’s important to understand the difference between raster and vector images to make the right choice for your project. Here’s a quick rundown to help you decide:
Key differences
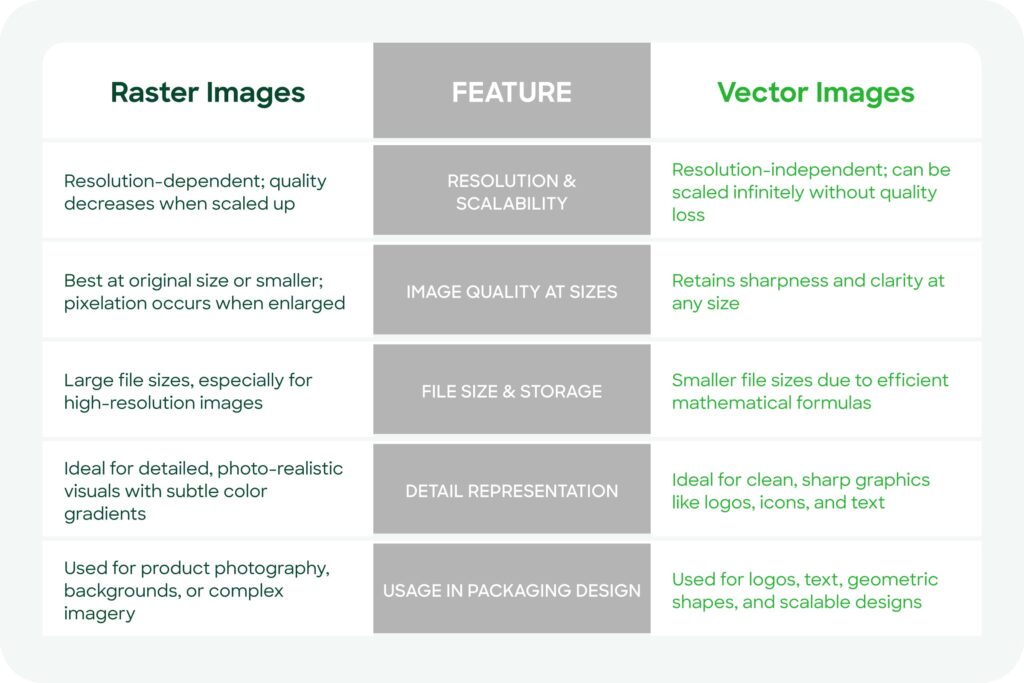
- Resolution & Scalability: Raster images lose quality when scaled, while vector images remain crisp and clear no matter the size.
- Image quality: Raster images are ideal for photo-realistic images, while vector images are ideal for crisp and clean graphics.
- File Size: Raster images are pixel-based, which means they tend to be larger in file size, while vector files are smaller and more efficient.
- Application in Packaging: Raster is ideal for intricate visuals like photographs, while vector is the go-to for branding components such as logos and dielines.
Now that you know the difference, you can strategically combine raster and vector elements in your packaging design to achieve the right balance of flexibility and quality in your final product.
Choosing the right format for your packaging
The right image format for your packaging design depends on several factors, including the type of design, specific packaging requirements, and the printing process. Here’s a detailed breakdown to help you make the right choice:
Things to consider
- Type of Design
- Use raster images when you need detailed, photo-realistic visuals, such as product photography or textured backgrounds.
- Use vector images when you need sharp, clean elements like logos, icons, and geometric patterns that require scaling.
- Packaging Requirements
- If you need to resize your design to accommodate different dielines, vector images are the way to go, as they will scale without losing quality.
- If you have a static design or one that is heavy in photographic content, raster images will work, provided the resolution is high enough for printing.
- Printing Methods and Specifications
- Raster images should have a resolution of 300 DPI or higher to ensure clarity in print.
- Designs must be converted to the CMYK color model to ensure accurate color reproduction.
- Vector files are easier to adjust for print settings, such as resizing or color changes.
Real-world examples
- When to Use Raster:
If your packaging features product photography or a detailed background with gradients and shadows, raster images are the ideal choice. For instance, a food box showcasing a high-quality image of a dish would benefit from the intricate detail that raster provides. - When to Use Vector:
For branding elements like your logo or textual components, vector files ensure consistent and crisp results across varying packaging sizes. For example, a logo that appears on both a small box and a large shipping carton will remain sharp and clear when created in vector format.
Frequently asked questions
How can you tell if a file is raster or vector?
- Check the file format: Common raster formats include .jpg, .png, and .tiff, while vector formats include .ai, .eps, and .svg.
- Zoom in on the image: Raster images will pixelate when zoomed in, while vector images will remain smooth and clear.
- Open the file in a design program: Vector files are typically editable in Adobe Illustrator, while raster files are more commonly manipulated in Photoshop.
By making the right design choices for your packaging, you can choose the right format for your project. By combining raster and vector elements effectively, you can create a visually appealing and functional packaging design.
Printing specifications for packaging
When it comes to packaging design, it’s important to consider the printing requirements to ensure your design looks great in print. These factors can greatly impact the sharpness, vibrancy, and professionalism of your packaging.
Image resolution: The 300 DPI standard
Resolution is a key factor in determining the clarity of your printed image. It’s measured in DPI (dots per inch).
- 300 DPI requirement: A resolution of 300 DPI or higher is required to produce crisp, high-quality prints. A lower resolution can result in pixelated or blurry images, which can negatively impact your packaging’s visual appeal.
- How to check DPI: You can check your image’s resolution by looking at its properties or using design software like Photoshop or Illustrator. Always make sure your images are 300 DPI or higher before sending them to print.

The CMYK color model and the importance of converting from RGB
- CMYK for Print: Printers use the CMYK (cyan, magenta, yellow, and black) color model to achieve accurate color reproduction, combining these colors to create the full spectrum of hues in printed materials. Learn more about printing in CMYK here.
- RGB for Screens: Digital displays use the RGB (red, green, blue) color model, which may not translate accurately to print.
- Why Convert to CMYK: Designs created in RGB should be converted to CMYK to avoid unexpected color discrepancies during printing. Most design software, like Adobe Illustrator, provides tools for conversion and color previews.
Box samples: A key to print quality
Ordering a box sample before mass production is a crucial step in the printing process.
- Visual Evaluation: A sample allows you to assess colors, resolution, and overall print quality to ensure they align with your expectations.
- Identifying Errors: Any design flaws, such as misaligned elements or incorrect colors, can be detected and rectified before bulk printing.
- Refining Packaging: Samples offer an opportunity to test materials and finishes, ensuring the final product meets your branding and functional requirements.
By following these printing specifications, you can confidently move forward with designs that are professional and representative of your brand. Taking the necessary steps to ensure proper resolution, color accuracy, and sample testing will ultimately save you time, money, and stress.
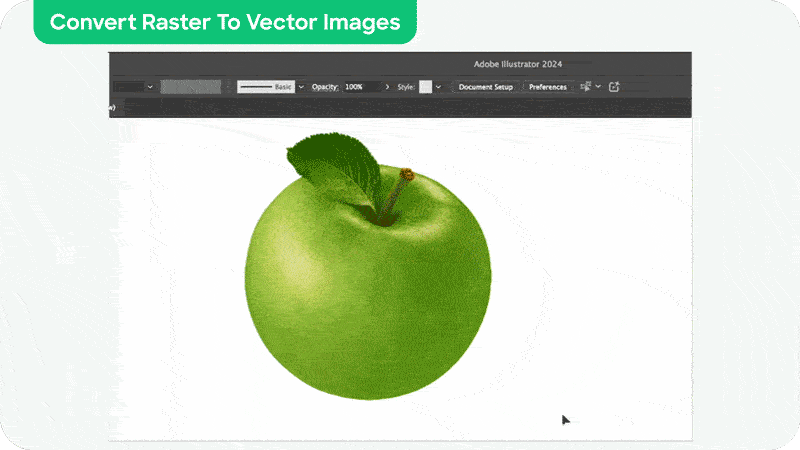
Converting raster to vector and vice versa
There may be times when you need to convert a raster image to a vector format, especially when scalability or precision is important for your packaging design. While this conversion is possible in many cases, it’s important to understand the methods, limitations, and best practices.
Methods for converting raster images to vector
- Using Adobe Illustrator:
- Adobe Illustrator’s Image Trace tool can convert raster images into vector paths.
- Use the tracing settings (e.g., detail level, color, or threshold) to fine-tune the conversion.
- Save the resulting vector file in formats such as .ai, .eps, or .svg for scalability and editing.
- Alternative tools and software:
- CorelDRAW: Offers similar tracing features for raster-to-vector conversion.
- Inkscape: A free, open-source option with basic vectorization features.
- Online Tools: Various online services can generate vector files, though they may have limitations in quality and customization.
Limitations of raster to vector conversion
- Image Complexity: Highly detailed or photo-realistic raster images, such as photographs, can be difficult to convert accurately into vector format. Subtle gradients and intricate textures may not be perfectly replicated with vector paths.
- Loss of Detail: Fine details in a raster image may be compromised during conversion, particularly if the image has low resolution.
- Manual Adjustments Needed: Post-conversion, you may need to refine or simplify the vector paths to achieve a polished result.
- Not Always Practical: Images lacking clear geometric shapes, such as natural scenery or product photos, are generally unsuitable for vector conversion.
Benefits of starting with vector graphics for packaging design
- Scalability: Starting with vector graphics ensures your design can be resized and adapted for various packaging dimensions without quality loss.
- Precision: Vector tools facilitate sharp, clean lines and shapes, essential for logos, text, and dielines.
- Efficient Editing: Vector files allow for easier adjustments, whether altering colors, repositioning elements or modifying text.
- Avoids Conversion Challenges: Designing in vector format from the outset eliminates the time and effort required for conversion and refinement of raster images.
Whenever possible, start your packaging design with vector graphics to maintain flexibility and quality throughout the process. While raster images have their place, particularly for detailed visuals, starting with vector files ensures your designs are optimized for printing and scaling from the very beginning.
Common mistakes to avoid
Even with a solid understanding of raster and vector images, there are several common mistakes that can still impact the quality of your packaging design and print outcomes. Here’s what to be mindful of to ensure a flawless result:
1. Using low-resolution raster images for print
One of the most common mistakes in packaging design is the use of low-resolution raster images.
- Why It’s a Problem: Low-resolution images (below 300 DPI) can appear pixelated or blurry when printed, compromising the professionalism of your packaging.
- How to Avoid It: Always use high-resolution raster images, especially for photography or intricate graphics. Check the DPI of your images before submitting them for print, ensuring they meet the 300 DPI standard.
2. Not converting designs to CMYK before printing
Colors that appear perfect on a screen can drastically differ when printed if the design is left in the RGB color model.
- Why It’s a Problem: Printers use the CMYK color model, and failing to convert designs can lead to color inaccuracies that deviate from your branding.
- How to Avoid It: Always convert your designs from RGB to CMYK during the final preparation stages. Most design software, such as Adobe Illustrator or Photoshop, facilitates easy conversion. Additionally, preview how the colors will appear in CMYK to ensure consistency.
3. Not considering scalability in packaging design
Disregarding the need for scalability can create challenges when adapting designs for various packaging sizes or layouts.
- Why It’s a Problem: Raster images used for elements like logos or text may become distorted or pixelated if resized for different dielines.
- How to Avoid It: Use vector graphics for all scalable elements, such as logos, text, and geometric patterns. This guarantees your designs remain sharp and professional, regardless of the size or dimensions of the packaging.
Final tip
To avoid these common mistakes, always conduct a thorough review of your design files before sending them to print. Working with packaging experts or printers can also ensure your files are correctly prepared, ultimately saving you time, money, and frustration.
Conclusion
Understanding the differences between raster and vector images is essential for achieving optimal results in packaging design and printing. Each format has its own unique strengths: raster images are ideal for capturing intricate, photo-realistic visuals, while vector images offer scalability and precision for branding elements like logos and text.
Choosing the right image format ensures that your packaging design looks great, whether it’s a small label or a large shipping box. By following best practices—such as using high-resolution images, converting to the CMYK color model, and ordering samples—you can create packaging that accurately represents your brand and resonates with your audience.
If you’re unsure about which format to use or need help with your packaging design, our experts at PakFactory are here to help you every step of the way. Whether you’re starting a new project or refining existing designs, we’ll help you create packaging that meets the highest standards.
Reach out to PakFactory today to embark on the journey of designing and printing your ideal packaging!